

At first glance, building a customer service chatbot may seem a daunting task requiring extensive coding skills and knowledge of natural language processing. But low-code solutions make it much easier. In this article, we are presenting our Proof of Concept that shows how you can automate customer service in your organization using a Microsoft low-code platform.
What is Power Virtual Agents?
One of the Microsoft Power Platform modules is Power Virtual Agents (PVA), an artificial intelligence tool with an intuitive graphic interface for designing and creating customer service chatbots without any advanced coding. The chatbots can then be implemented on multiple channels: your website or online store, in Facebook or Microsoft Teams, for internal employees, and for company customers.
Most importantly, PVA is perfectly integrated with Power Automate services, whose built-in connectors enable advanced flows and access to external data and services. In today’s article, we will present a case study to show how Microsoft Power Virtual Agent and Power Automate can help improve business processes.
Read more on low-code development:
Unleash your superpowers with new Power Platform AI capabilities
Is low-code development a panacea for the tech talent shortage in 2023
Hyperautomation—an emerging technology trend for 2023
Power Automate flow with Teams: how to optimize the approval process
How to build a customer service chatbot with Microsoft Power Virtual Agents
Low-code app development—a trend for 2022
Digital process automation with low-code platforms—5 typical use cases
AI Builder–artificial Intelligence for knowledge workers
Microsoft’s Power Virtual Agents: for highly capable chatbots
What is Microsoft Power Platform—an overview of the main features
The case study
Imagine an IT company that offers various web application design and implementation services. Its website fully showcases all of its services and products. Naturally, the firm has customer service agents to handle existing clients and to provide information to prospective customers. When a prospect makes contact, the customer support team is responsible for collecting the information a suitable consultant would need in order to prepare a customized offer.
The situation is less than ideal, however. While consultants use a CRM system built on Microsoft Dataverse, the customer service team uses an ERP system that, for technical reasons, isn’t integrated with Dataverse. In addition, this ERP system is installed on local servers (on-premises).
The customer service team is available during business hours—9 am to 5 pm. However, surveys and query time analysis clearly show that a significant proportion of clients would like access to assistance outside regular business hours.
Currently, when a customer submits an inquiry via a contact form, a department employee must manually register it in the ERP system, contact the customer to collect details, and then notify the representatives who will prepare an offer. This next step in the process is supported by the very CRM system that the customer service team cannot access.
So our imaginary firm has a service process that requires people, during business hours, to move data from one system to another. This often results in long delays, important information being lost, and worst of all, a negative customer experience.
Our imaginary IT company’s goal is to provide customer service 24 hours a day by automating the form handling process, initiating offer preparation, and improving customer satisfaction.
The solution: a chatbot with Power Platform
The company decides to provide customer service 24 hours a day by implementing a customer service chatbot on its site.
The first step is to configure the topic in the Power Virtual Agent. The chatbot will need to identify the topic of a conversation in order to find the right range of responses. To configure this, click the “New Topic” button and complete the relevant information.

Fig. 1 A New Topic button
In our example, the trigger phrases will be the words “Build website,” “Buy application,” “Implement system,” “Buy services,” and “Buy system”:
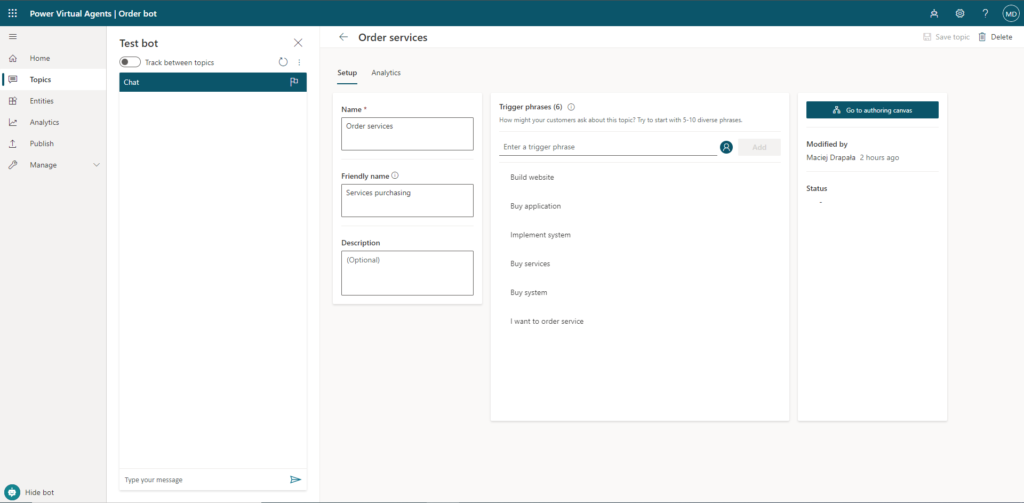
Fig. 2 New Topic—Order services
In the next step, we configure the entity that will allow us to appropriately categorize company services. To do this, click the “New Entity” button and enter the name “Service Category” and description “Order IT Service,” then enter elements of the “Items:” entity.
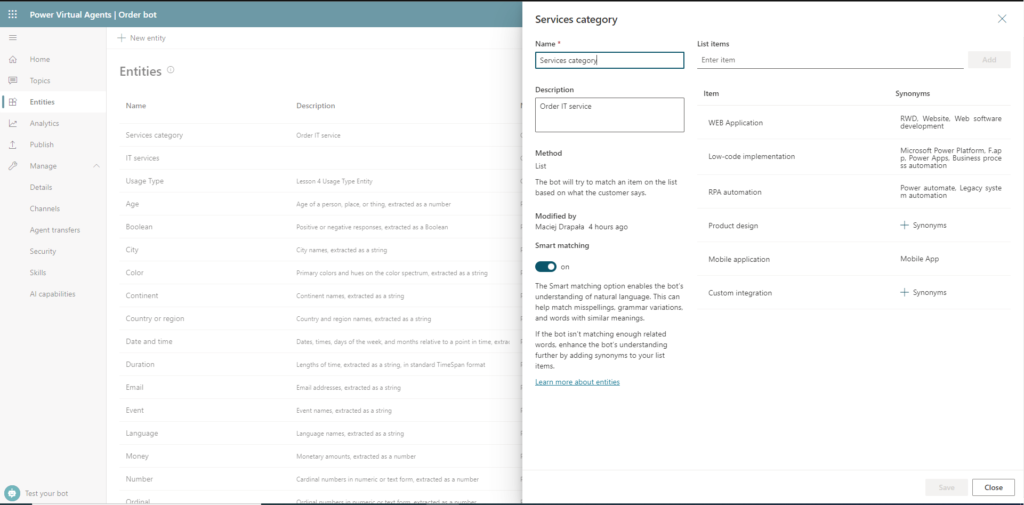
Fig. 3 New entity—Service category
It is important to carefully consider and imagine all of the possible synonyms the customer might use with a chatbot. In our configuration, the WEB Application conversation will launch when the customer enters the words “RWD,” “Website” or “Web Software Development”:
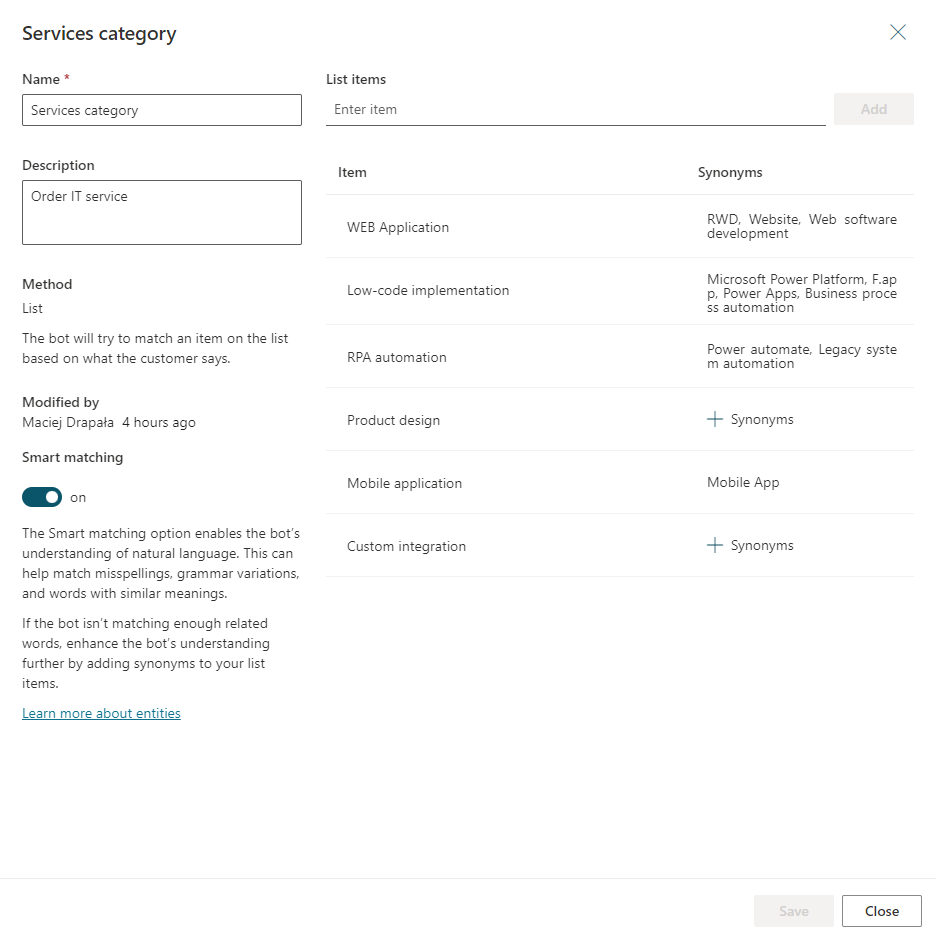
Fig. 4 New entity—Synonyms
PVA uses entities to identify information such as names, dates, numbers, and currencies in text phrases the user enters. Once the service has isolated and identified these entities, it can decide on the next step in the chat and control its path.
The next step for us is to configure the conversation. Each topic consists of two parts:
- “Triggers” are keywords, phrases or statements the user might use.
- “Conversation nodes” determine how the customer service bot should react.
Each topic has its own flow. When the bot identifies a trigger for a given topic, a chat is initiated.
Configuring the customer support flow
After the trigger phrase is entered, the chatbot should ask the question, “What kind of IT services would you like to order?” For this purpose, we add a “Questions” node and enter this question:
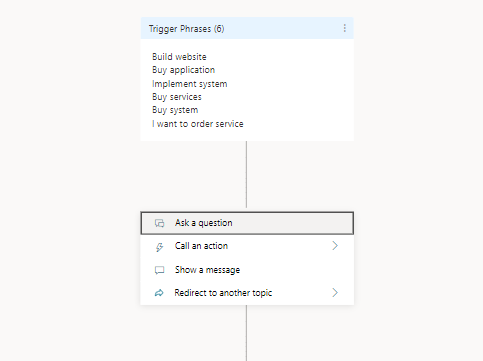
Fig. 5 Flow—questions
Then in the Identify field we choose the provided “Service Category” entity:
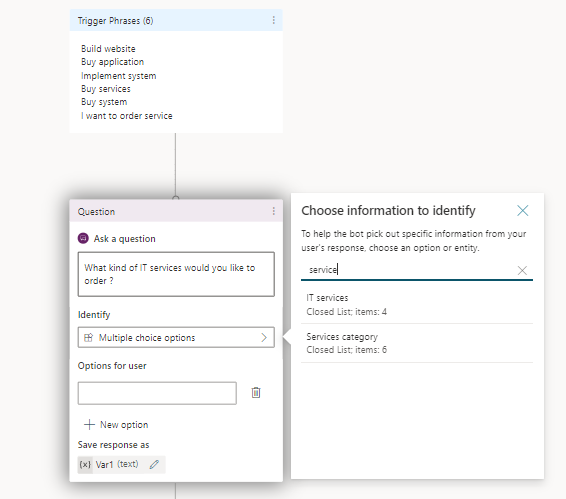
Fig. 6 Flow—identify
and we choose the user’s selection options (Options for User). We limit the choices to the services we offer:
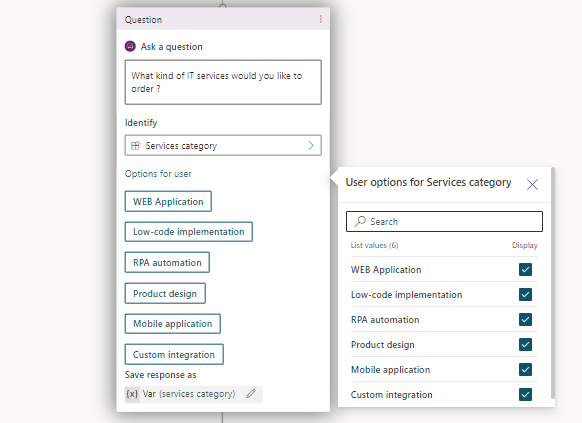
Fig. 7 Flow—User options
The user’s selection will be saved to the variable “Var.”
We can now determine how the conversation will continue by adding “Condition” blocks. In our case, we will focus on the selection of the “Web Application” category and add the question “What kind of application are you looking for?” Then we will set the possible responses, “Custom” and “Out of the Box,” as check boxes :
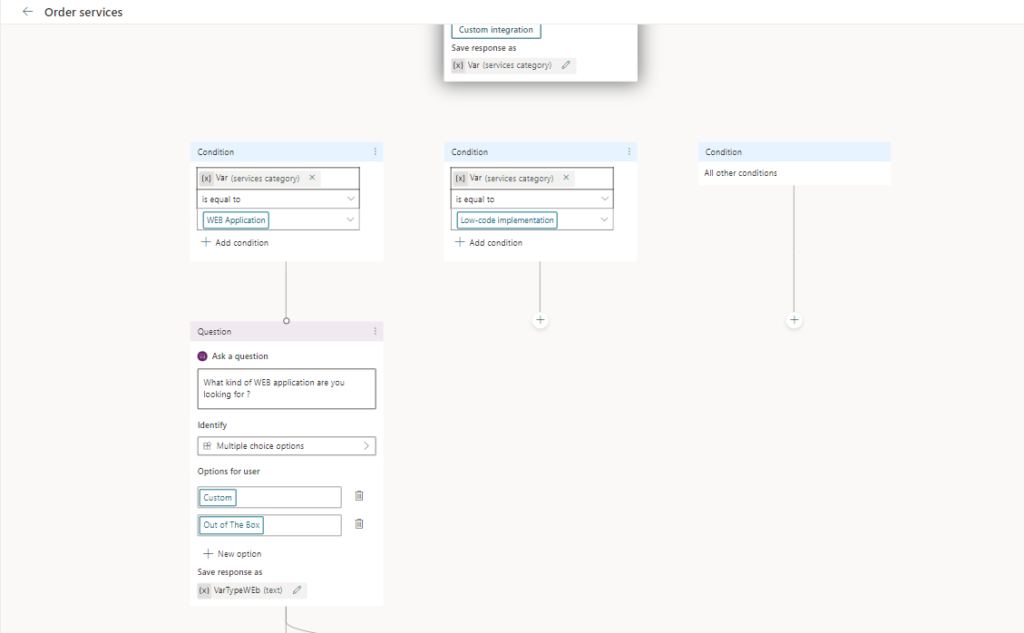
Fig. 8 Flow—conditions
The user’s selection will be saved to the variable “varTypeWeb.”
The value of varTypeWeb will determine whether the chat proceeds down the “Custom” path or “Out of the Box” path (known as Condition blocks). Here, both paths lead the customer service chatbot to ask about the customer’s projected budget with the question, “What price range?” Because this is naturally an open question, we will use the built-in variable “Money.” The chatbot will know to extract the value of the response as a currency value:
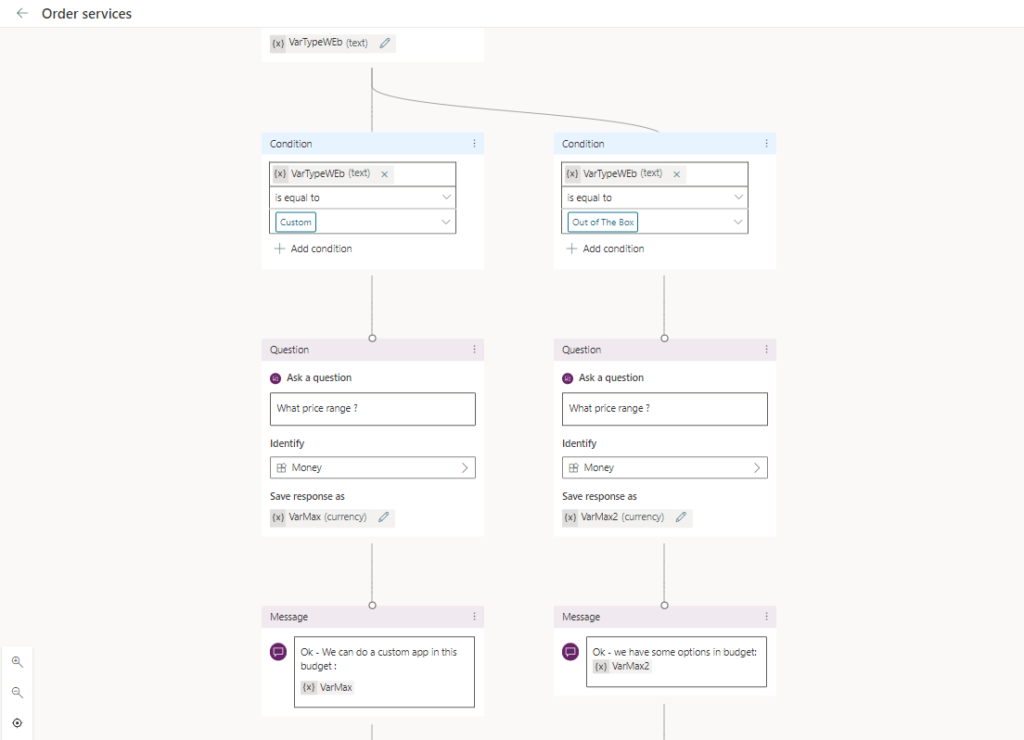
Fig. 9 Flow—a question
At the end of this path, the user’s response will be saved to the variable “VarMax,” and the chatbot will inform the client if the project is possible within the given budget.
Next, we ask the user to provide contact details—name and email address—with “Questions” elements. These values will be saved in the variables “VarDane” and “VarEmail,” respectively:
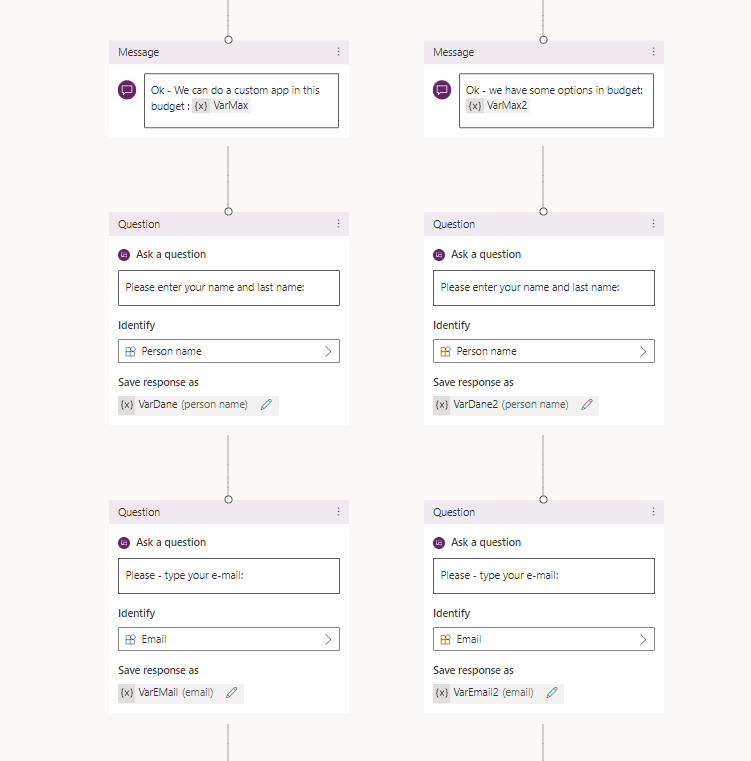
Fig. 10 Flow—the questions about personal data
Since the purpose of this solution is to automate the customer inquiry process and set the process of preparing an offer in motion, the data that the chatbot collects will automatically be saved by the Power Automate service in the CRM (cloud flow) and the external ERP (desktop flow). Flows in the Power Automatic service can be initiated with the “Call Action” node within the topic:
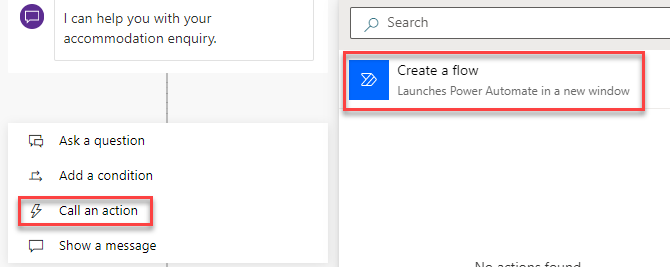
Fig. 11 Flow—Call an action
Then we map the parameters we want to send to a specific flow:
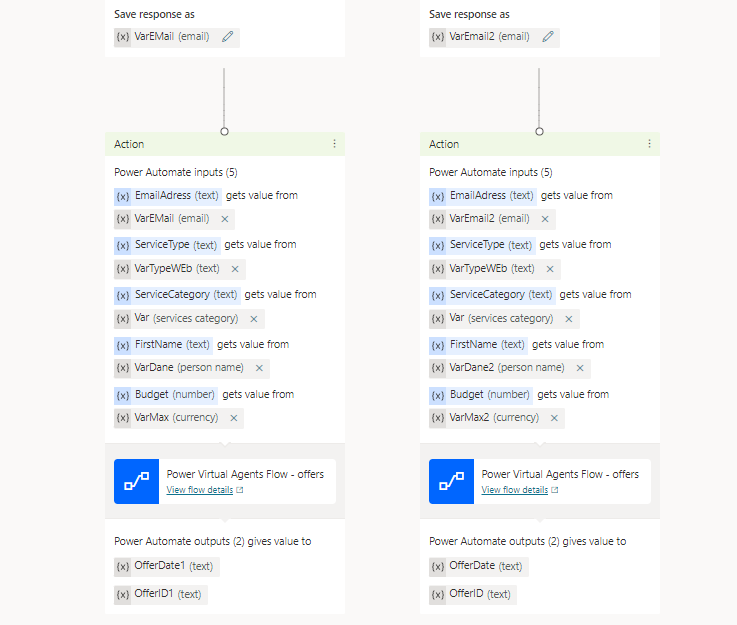
Fig. 12 Flow—mapping parameters to Power Automate
Once the Power Automate flow ends, the parameters can also return so that PVA can create and send an appropriate message to the customer:

Fig. 13 Flow—message with parameters from Power Automate
As noted earlier, we can also set up a Power Automate Desktop flow as part of the cloud flow, and save data in the external system on a local server, such as an ERP.
In our case, we want the flow to first write data into Dataverse so that a consultant can access it and prepare a model-driven application for Customer Service. The new offer is then saved in an Excel file on the on-premises server, mirroring the ERP system.
As a result, the first step in configuring the cloud flow is to call the “Add new row” action in Dataverse. In Dataverse, according to data provided from the PVA service, we create a record in the database (table: “offer_ITS”):
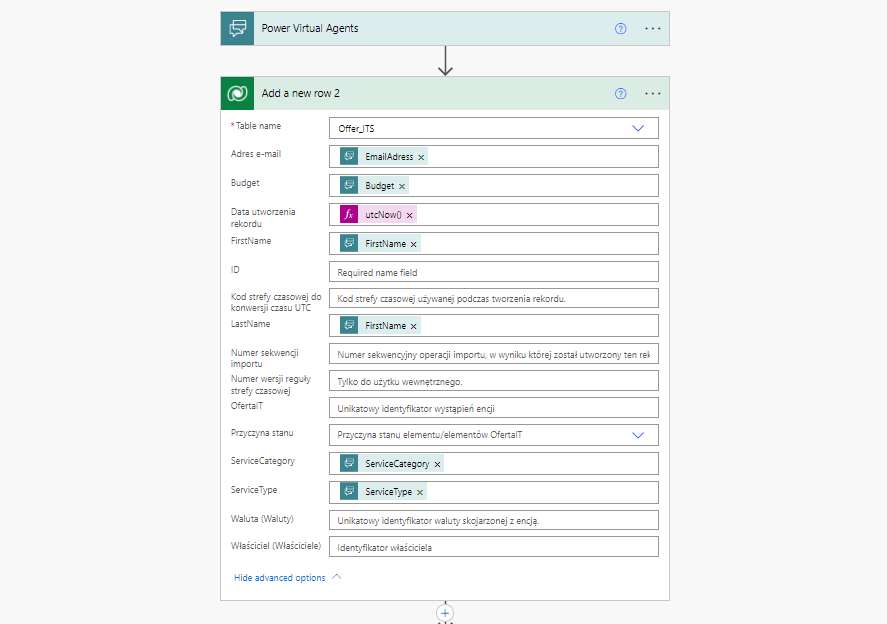
Fig. 14 Power Automate flow in PVA
Once the Dataverse record is created, we call an “Offer” flow, which will need to be configured in Power Automate Desktop. We pass parameters to the flow from PVA service and give the offer number in Dataverse :
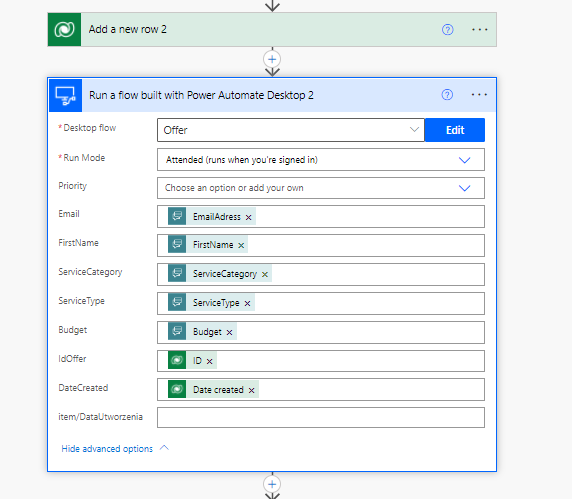
Fig. 15 Flow—invoking Power Automate desktop in Power Automate flow
Then we return the offer number and its date created to the PVA service, and trigger an e-mail to the customer
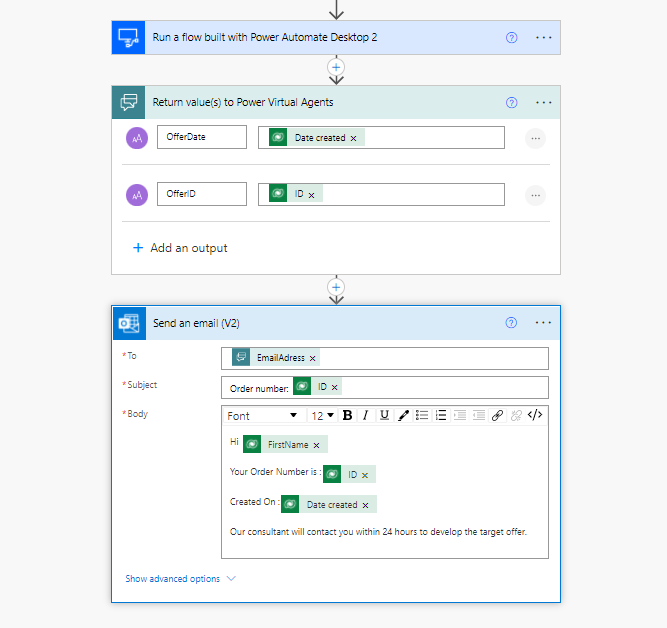
Fig. 16 Flow—returning variables to PVA and sending an email
Configuring a flow with the Power Automatic Desktop service is quite simple. It involves opening an Excel file on a local machine and populating the offer data with the data obtained in PVA and Power Automate cloud flow:
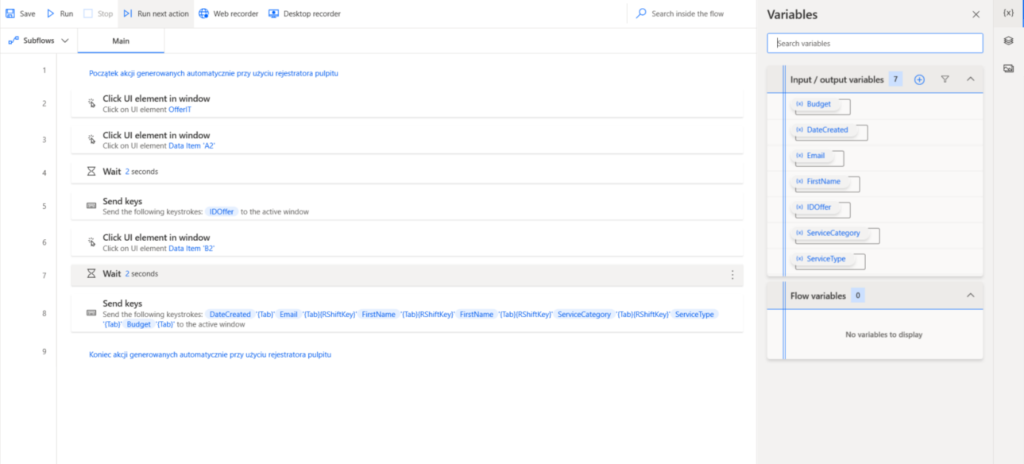
Fig. 17 Flow—runing Power Automate Desktop
The Excel file looks like this:
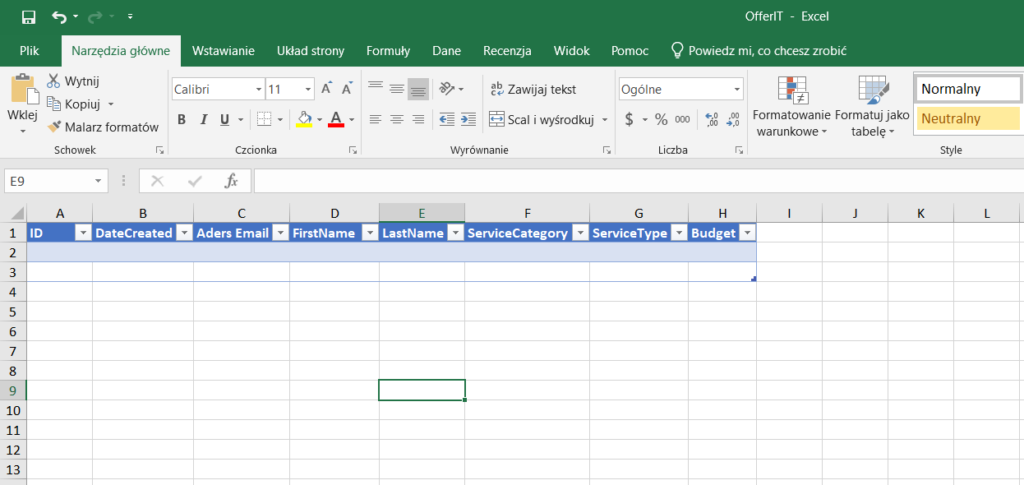
Fig. 18 Excel file structure
Testing the application’s customer interactions
To test that our application works as desired, we can run the customer service chatbot in test mode and start a chat:
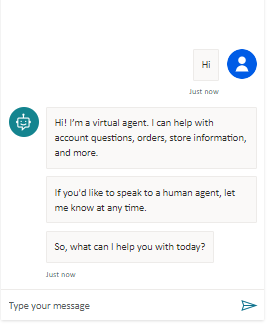
Fig. 19 Runing the chatbot in a testing mode
We enter the trigger phrase “I want to buy application”:
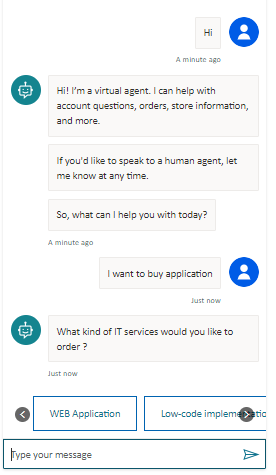
Fig. 20 Testing the chatbot—a trigger phrase
We see that the chatbot recognized the phrase “buy application” and displayed the questions and selections we chose . In the “Services category” entity for the “Web application” category, one of the synonyms was the word “website”. The customer can now click one of the selections, or type a word or phrase:
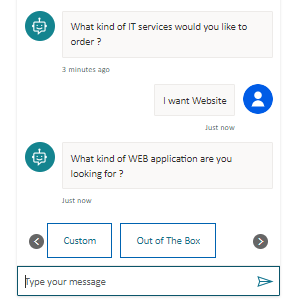
Fig. 21 Testing the chatbot—choose a service category
As we see here, the chatbot properly understood “I want a website,” identified the relevant category and has followed the path to the next question. Now, our “user” will choose a “Custom” application:
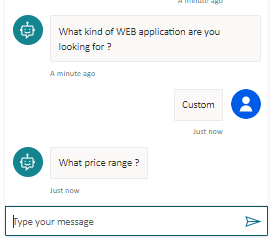
Fig. 22 Testing the chatbot—a question about budget
In the next step, the system asks the client about the budget. You will remember that at this point we used the built-in Money entity to help identify the number in the response. We will write the sentence, “I have more than 28000.”
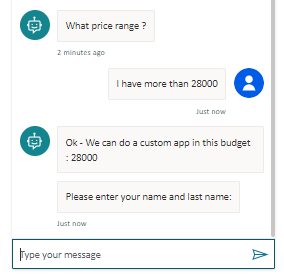
Fig. 23 Testing the chatbot—a question about personal data
The chatbot extracted the value of 28000 and confirmed that custom applications can be built within this budget. In the following steps, the system asks for the customer’s contact information:
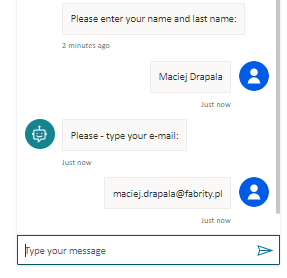
Fig. 24 Testing the chatbot— a question about personal data
At this point, the customer service chatbot initiated a Power Automate cloud flow and entered the offer in Dataverse :
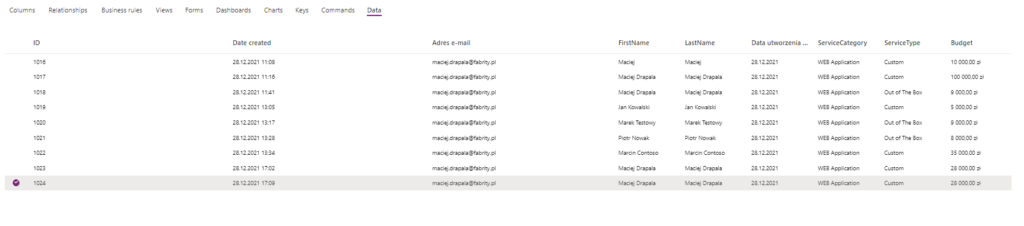
Fig. 25 Testing the chatbot—adding data to Dataverse with Power Automate cloud flow
Then, it used the Power Automate Desktop service to enter the offer on a local machine in the Excel file “offerit.xlsx”:

Fig. 26 Testing the chatbot—adding data to a local Excel file with Power Automate Desktop
Next, it returned to the chat to provide the customer with an offer number, the date of submission and a promise that a consultant would get in touch:
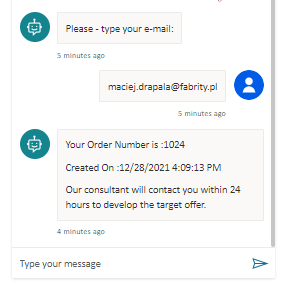
Fig. 27 Testing the chatbot—information to the customer
Additionally, it sent the customer an email notification:
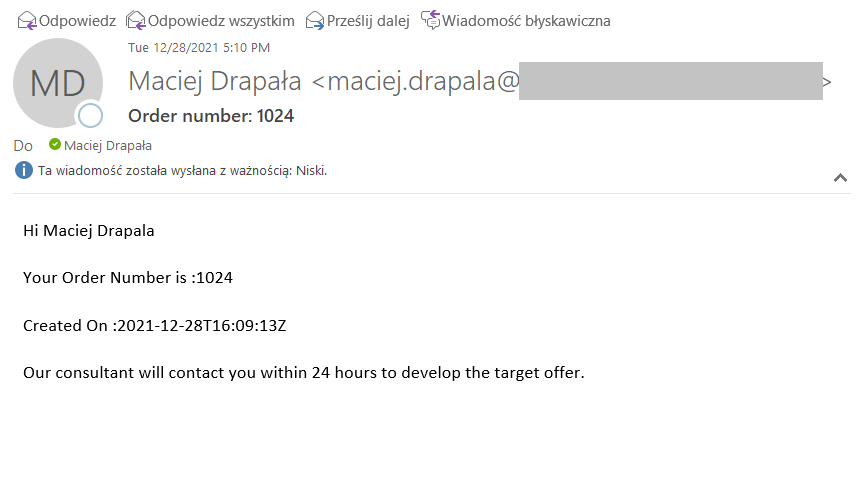
Fig. 28 Testing the chatbot—an email to the customer
Overall, our workflow looks as follows (see Figure 29):
- A customer wants to order an IT product or IT services and makes an inquiry.
- A Power Virtual Agent chatbot gathers basic project information (what type of product/service, price budget, contact details, etc.)
- Power Automate cloud flow sends the data gathered to a Dataverse (a CRM system).
- Power Automate desktop flow sends the created customer record (lead) to an external on-premises ERP system.
- Power Automate cloud flow sends an email to the customer confirming the order (ID number, Date Created) and indicating when he/she will be contacted by a consultant.
- Power Virtual Agent chatbot confirms the order and indicates when he/she will be contacted by customer support.
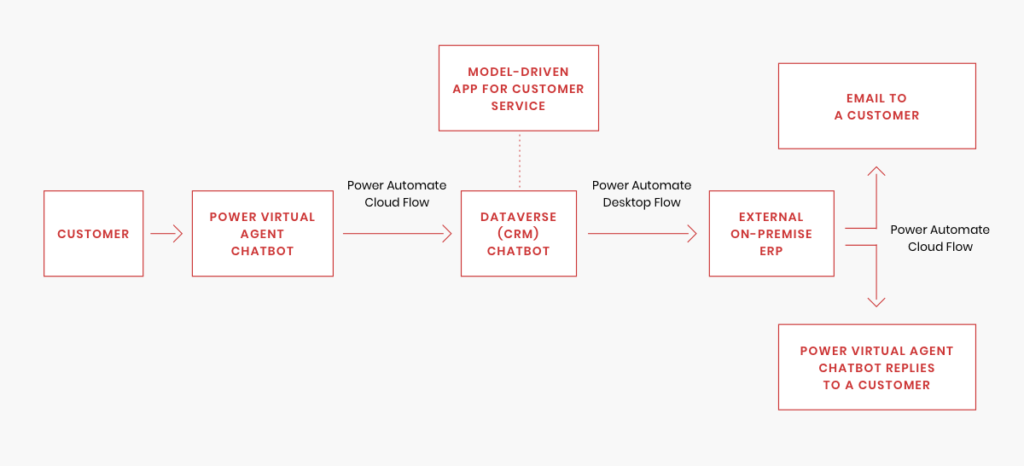
Fig. 29 Microsoft Power Platform—the map of the business process implemented
We can take additional steps using Microsoft Power Apps (also a part of Microsoft Power Platform) to create a model-driven app. The customer service department can use the app to manage the entire customer service process.
Wrap-up
This simple example hints at the possibilities the Microsoft Power Platform platform and its individual services can provide. Once an offer is registered in Dataverse, we could build a simple model-driven application for the next steps, so that the customer service team can monitor the entire process. In addition, the consultant would simply check a task list on any device (browser, mobile, tablet) to see offers awaiting preparation. Any offers requiring management approval may trigger an approval process flow.
The most important advantages of customer service chatbots are being able to handle customer requests 24 hours a day without adding any staff, eliminating a source of errors from offers, and being able to monitor the process. It’s a versatile self-service tool.